
Fubar Glue|Home
PLEASE NOTE: ANY PURCHASES MADE FROM 07/08/19 TO 07/18/19 WILL BE SHIPPED ON 07/22/19 or sooner if possible! THANK YOU FOR YOUR PATIENCE…
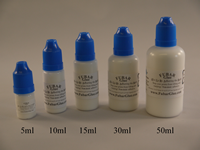
We have (5) convenient Fubar Glue sizes available. Choose the size that works best for the amount of printing you do! Its formulated for 3d Printer Build Beds.
FUBAR GLUE & One of the biggest challenges to 3d printing
3d printing is a great new technology for everyone to use. From the experts to the beginners, it offers a new choice for people to create and re-create both new and old everyday items. But as we all know, along with new technology also comes the challenge to get results the way we want them. One of the greatest challenges the 3d printing community is trying to solve is keeping 3d prints on the printer build bed. When plastics, in our case the filaments, are heated to deposit a layer of material on the bed and subsequently on top of each other, (thus called additive manufacturing), a condition is created as the temperature of the plastic decreases. This is known as shrinkage or warping.
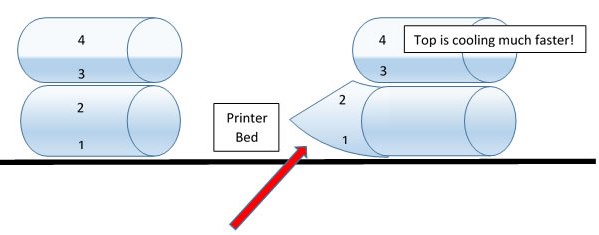
Plastics will shrink at different rates depending on the state they’re in during the cooling process. When they are in a more solid state, they will shrink at one rate. When they are softer or in a more fluid or molten state, they will shrink at a different rate. The example below shows two layers of filament. The bottom of the bottom layer on the printer bed is the coolest. The top of the top layer is the hottest.
This is the warping area
Most prominent at the outside ends or corners of a 3d print.
Start Printing During Cooling
In the above example, section (1) is printed on the build bed first. It starts to cool first as it gives up its heat to the bed faster than section (2). Section (2) cools slower as it tries to give up its heat to the air. As the 2nd layer is put on, section (3) gives up its heat to section (2) thereby cooling faster than section (3). Because of this phenomenon, the print at section (1) lifts up from the bed. Even if one side is cooling faster and shrinking faster, the other side is still pliable enough to shrink along. Once one side cools past a certain temperature two things happen. First, the material stiffens and can’t shrink with the other side. The stiff side is no longer shrinking and the other side continues to shrink. Therefore, as the pliable side continues to shrink it is pulls on the print and causes a bow in the direction of the side that cooled last.
Controlling this rate is nearly impossible. Some people turn on fans to help cool the layers. This is not a good solution since the rate at which the plastic cools will not be consistent from the top of one layer to the next and will cause very poor adhesion between the layers. Another method is to slow down the speed of the printer. This of course is not really a good solution since print times escalate to unacceptable levels.
[bs_collapse id=”collapse_0968-9921″]
[bs_citem title=”Solutions for a Quality 3d Print” id=”citem_d4c4-2e58″ parent=”collapse_0968-9921″]
Since 3d printing began, hobbyists and expert printers have tried to come up with a solution to warping and lifting. With the creation of new filaments constantly hitting the market, the challenge to secure the 3d print to the build bed gets harder and more demanding because of the materials, speeds, complexity and 3d printers available to the public.
1. First and foremost, learn about your machine and its capabilities. Don’t skimp on the details. If you don’t know what your machine can or can’t do, how do you know what to adjust or if the machine is even capable of doing what you want.
2. You need to learn about your materials. All filaments are not created equal. Abs and Nylon, although both polymers, have completely different characteristics and running conditions. They also shrink at different rates. (See table below)
3. Understand the best way to design a part to minimize warping. Learn about in-fill, layer patterning and creating a raft on the build bed to layer your print on. A raft can be described as a latticework of filament, printed on the build bed as a structure underneath your print. It is larger than your 3d print will be to help spread the load of the print making it stronger as well as “absorb” some of the forces of shrinkage. By creating this structure on top of a prepared surface you will minimize or eliminate the consequences of warping.
4. Test your own solutions under many conditions. Speed, printer nozzle tip size, heat settings, filament materials, layer height as well as others all play pivotal roles in the final quality of your print.
5. Level your build bed. If you don’t complete this task before all others you are wasting your time. A level bed will ensure that your first layer gets extruded onto the build bed as perfectly as possible. This will contribute significantly to the adhesion of the first layer to the bed as well as the bed prep material you ultimately use. This is where “adhesion materials and glues” come in to play.
[/bs_citem]
[bs_collapse id=”collapse_0968-9921″]
[bs_citem title=”Common Plastic Shrinkage Rates (Chart)” id=”citem_1090-9a44″ parent=”collapse_0968-9921″]
| Description | Shrinkage in/in |
| ABS High Impact | 0.005 - 0.007 |
| ABS Heat Resistant | 0.004 - 0.005 |
| ABS Medium Impact | 0.005 |
| Nylon 6/6 | 0.010 - 0.025 |
| Nylon 6/6 | 0.007 - 0.015 |
| Nylon 6/10 | 0.010 - 0.025 |
| Nylon 11 | 0.010 - 0.025 |
| Nylon 12 | 0.008 - 0.020 |
| Nylon Glass Filled | 0.005 - 0.010 |
| PET | 0.003 - 0.005 |
| Polyethylene Low Density (LDPE) | 0.015 - 0.035 |
| Polyethylene High Density (HDPE) | 0.015 - 0.030 |
| PPO/Styrene CO (NORYL) | 0.005 - 0.007 |
| Polypropylene | 0.010 - 0.030 |
| PPO/Styrene G.P. | 0.002 - 0.008 |
| PPO/Styrene Heat Resistant | 0.002 - 0.008 |
| PPO/Styrene Impact Mod | 0.003 - 0.006 |
[/bs_citem]
[bs_collapse id=”collapse_0968-9921″]
[bs_citem title=”Bed Preparation” id=”citem_3459-e0fe” parent=”collapse_0968-9921″]
The list of materials for the bed to be made of is quite long. Typically, a 3d printer has either a glass or aluminum build plate, (particularly when using a heated bed). Others use plastic sheets, MDF, poplar wood, lexan, Garolite, hdpe and the list goes on and on. Users find that a certain material may do “well” but doesn’t last, is cost prohibitive or even when using the same material because of the complexity of the print won’t work. Very frustrating to say the least.
Next comes the bed preparation method. Basically what can someone put on the build bed that’s cheap and easy and will create a good surface for the filament to adhere to all the time. Painters tape, Kapton tape, glue sticks, mixing bits of the filament in acetone to make up a “glue solution”, hair spray (very flammable) and lots of other adhesives have been tried and used for years.
Glues specifically formulated for using on build beds to improve adhesion and stop the lifting and warping are now available. Our FUBAR GLUE has been formulated just for this purpose. Non-toxic and easy to use, it was developed and tested to run using NYLON 12 Filament from www.rdmfilament.com and does a great job. We had it tested on other filaments found it to work great on most filaments available today.
[/bs_citem]
[bs_collapse id=”collapse_0968-9921″]
[bs_citem title=”Using our Product” id=”citem_2f8a-6732″ parent=”collapse_0968-9921″]
Print beds come in many sizes, shapes and materials. One of the most common sizes is a bed measuring approximately 8″x8″. To coat this size bed you will need approximately 25 drops or less of Fubar Glue. Using a plastic scraper (which we supply free) or any other flat, thin plastic material you need to spread it evenly across the entire bed. Then let the glue dry completely by air-drying. Don’t use your heated bed, as it tends to drive out moisture in the glue and may not work as well. That’s it! Then set the bed temperature to your required running temperature.
We have printed on this one coating of glue upwards of 15 times and not had to remove and replace the glue. The parts weren’t complex but worked just fine. For more complex pieces 10+ prints on the same coating were not uncommon. For those prints that really get stuck to the printer bed, the glue dissolves readily in a little warm water. It will loosen the part and you will be able to remove it quite easily. Your overall experience may certainly differ due to experience level, machine, filament used, temperature settings, and even room and material conditions. Our experiences may differ completely from yours.
[/bs_citem]
Fubar Glue comes in five different convenient sizes. 5ml, 10ml, 15ml, 30ml and 50ml bottles of glue are available for purchase. (1)ml is equivalent to approximately 20 drops of material. Quantity discounts are available when you purchase more than two bottles of any size product. Thanks for visiting our site and if you have questions please contact us by using this form..

Free Shipping available anywhere in the U.S.A. See Product Pages for Details!